Old Version -Repeat-
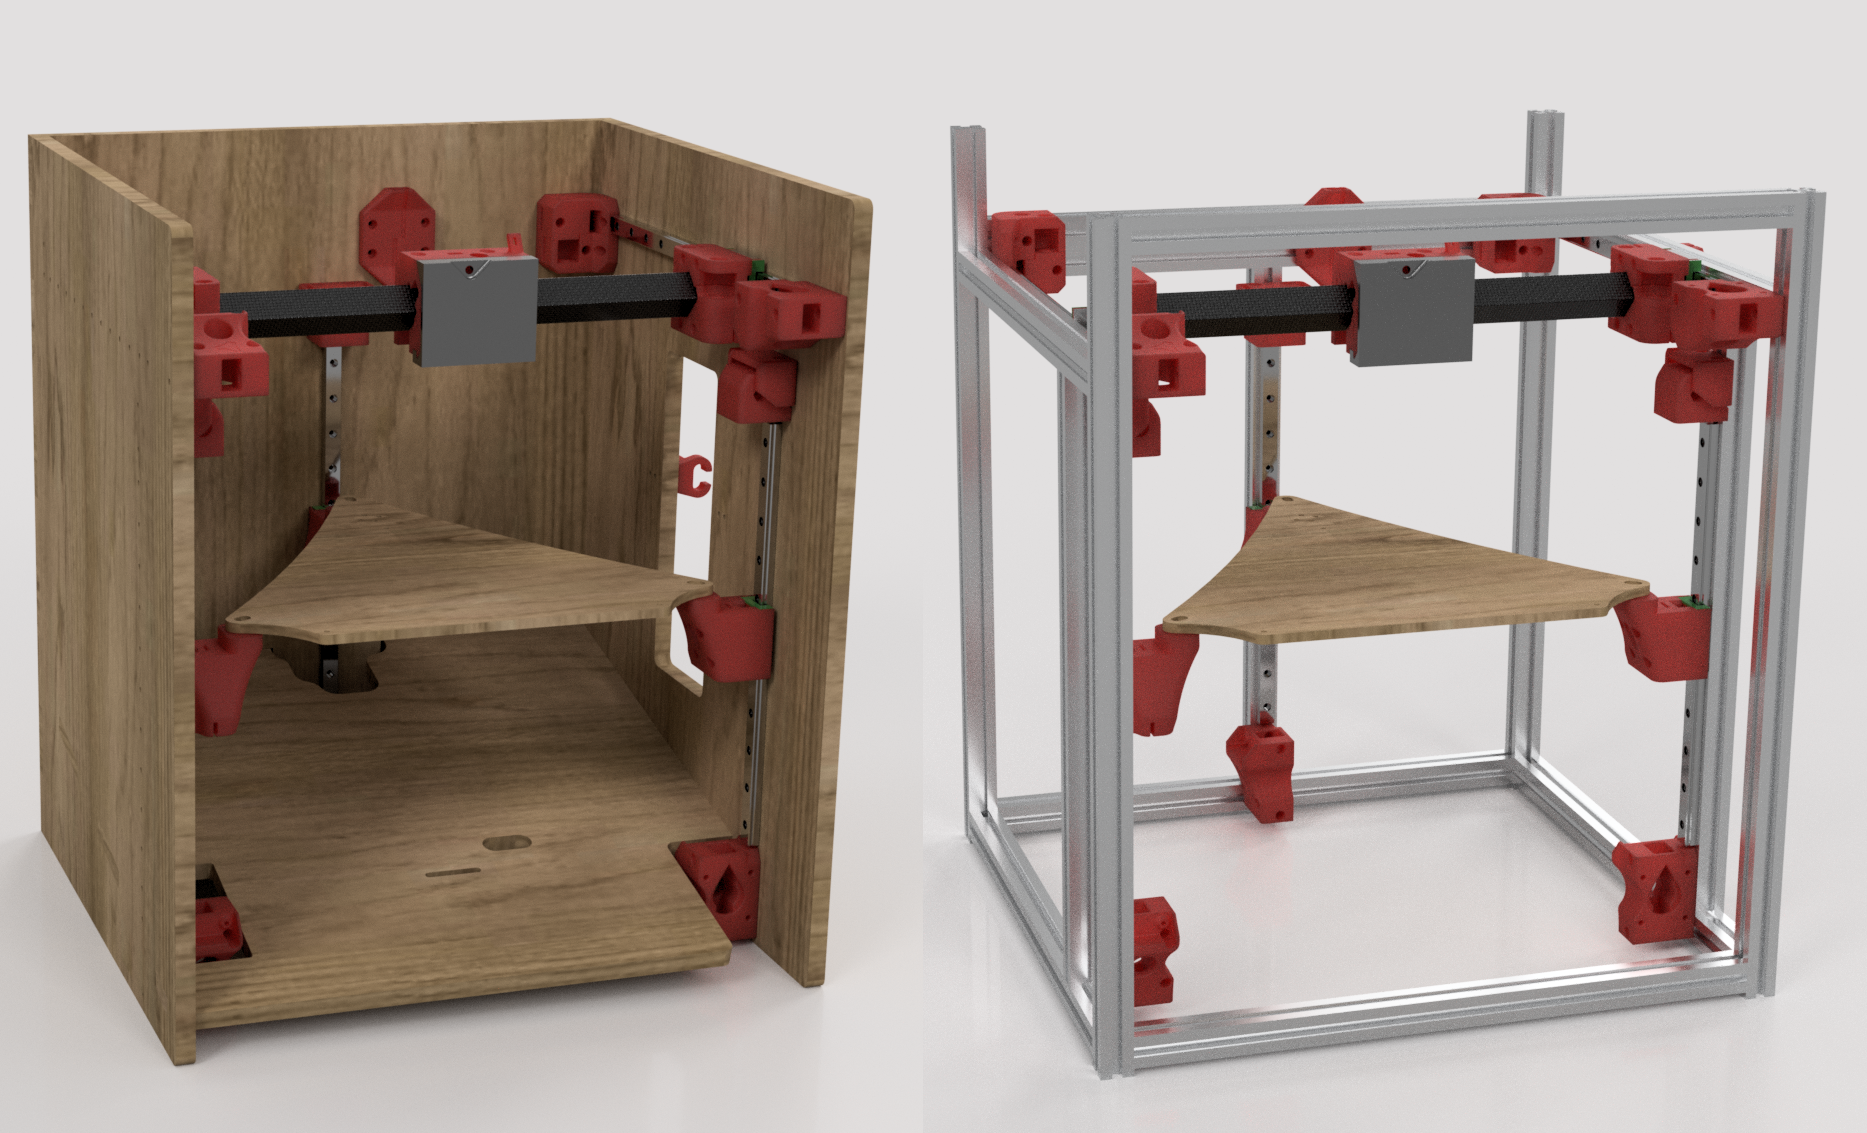
This is the MP3DP -Repeat- Milled/Printed 3D Printer “Repeat”. This can be a fun project to use your new CNC mill for. This is my take on a CoreXY 3D printer, with a CNC mill friendly frame, or even a 20 series extrusion frame, options!
The Repeat is a whole new take from the previous two designs, and I wanted to get a little experimental this time around in a few ways.
-
CoreXY instead of a “bed slinger”. After two fun ZenXY designs using CoreXY I think I have wrapped my head around the strengths and weaknesses of this geometry.
-
More frame options, instead of just material and thickness, you cannot opt to use 80 series extrusions instead of milled flat parts.
-
Direct Belt Driven Z axis. The resolution is there, quiet, fewer unique parts.
-
Hardware bed leveling (true bed leveling), and software (mesh leveling). Takes a bit longer to get started but flawless first layers are worth it. Time to make more accurate parts.
-
Simple Universal tool plate. Mount any extruder, laser, drag knife, pen, etc…
-
Carbon fiber and linear rails. Quiet, accurate, and light where it is needed. The larger the build the more noticeable the weight loss.
-
CAD files are available! Edit it to your hearts content, this is an open design and is licensed under a Creative Commons Attribution-ShareAlike 4.0 International License.
-
Very few unique printed parts, so editing is simple. 11(?), at last count.
This Printer
If you just want to open a box and have a ready 3D printer there are a few solid options out there, this really is not one of those. The MP3DP Repeat is a printer for those of you that want to build one, get your hands dirty, and learn a thing or two! Currently, this is just a guide, not a full set of instructions. If anything is unclear let us know and we can add a picture or two. Hopefully nothing is too tricky here.
Questions and comments should be directed to the V1 Engineering Forums. Asking questions is how these instructions get written. If you don’t ask I will assume I don’t need to write instructions for it. If you want to help write the instructions please click the little wrench icon in the upper right corner of this document, please.
Control Boards
You will need a control board with at least 6 drivers, E-XY-ZZZ. The SKR Pro works well and we have a pre-configured firmware for it, V13RP_SkrPro_2209. Many other boards and firmware will work as well.
Frame Options
You can use extrusions, or Milled parts. This is where I am going to let you know it would be best to refer to the CAD model for this. Flat parts can be adjusted for thickness and joining method, Extrusions will get exact lengths. This printer is pretty easy to make any size you want if you are having issues adjusting the CAD model I will add some notes down below.
details to come…
If you choose a milled frame have fun with it, cut in some flavor, no need to have all that material there, you have a CNC machine use it!
| QTY | Part Name | Comments |
|---|---|---|
| 1 | placeholder |
Specialty Parts
| QTY | Description | Comment | Link |
|---|---|---|---|
| 1 | Control Board | 6 driver minimum | Shop – Amazon |
| 5 | Steppers, Nema17 | 20mm+ shaft length | Shop – Amazon |
| 1 | Extuder or other tool | Hemera,example, match voltage | Fila – Amazon |
| 5 | Pulleys 16T 10mm | 10mm GT2 16 Tooth | Shop – Amazon |
| 9 | Idlers w/Teeth 20T | 20T w/Teeth 5mm Bore | Shop – Amazon |
| 2 | Idlers Smooth 20T | 20T Smooth 5mm Bore | Shop – Amazon |
| x | Belt GT2 10mm | See Calculator, no steel belt | Shop – Amazon |
| 5 | Endstop Optical | Must use this exact style | Shop – Amazon |
| 6 | Wheels | POM V wheel 5mm bore 15.3mm OD | Shop – Amazon |
| 1 | Heated Bed | Style and Size will vary | Shop – Amazon |
| 3-4 | Springs | For bed, silicon tube will work | Shop – Amazon |
| 5 | Linear rails MGN | 2-XY+3-Z From CAD MGN12H | Fila – Amazon |
| 1 | CF Square Tube | length from CAD 20mmx20mm | King – Amazon |
| 1 | Power Supply | Match voltage | Fila – Amazon |
| * | Thread locker | Optional for grubs screws | Shop – Amazon |
| * | Lube | Optional for idlers | Shop – Amazon |
| * | PTFE Tube | Optional Extruder to filament | Shop – Amazon |
| * | Print Fan | Optional fits hemera mount | Shop – Amazon |
As an Amazon Associate I earn from qualifying purchases.
Printed Parts
No Support needed. Infill on the parts is not a big deal I use 20%+ will be fine 40% is really nice, but make sure to use 2-3 perimeter walls to keep the through hole support.
I have the parts available at these hosts if you are not comfortable exporting directly from the CAD model PrusaPrinters, Thingiverse, or GitHub.
| QTY | Name |
|---|---|
| 5 | Stepper Mount |
| 4 | Truck Trigger |
| 3 | Z Bed Slider |
| 3 | Z Post |
| 3 | Z Idler |
| 2 | Truck Spacer |
| 2 | Belt Tugger |
| 2 | Corner Inner |
| 2 | Corner Outer |
| 1 | Hub |
| * | Optional Parts |
| 2 | Extruder Passthrough |
| 2 | Spool Mount |
| 1 | Filament Guide |
Hardware
Needed for all types of build
| Qty | Name | Comment |
|---|---|---|
| 29 | M5x30mm | Pan Heads |
| 29 | M5 Nylock | |
| 52 | M3x10mm | Pan Heads |
Components to box wall
This is going to be tricky depending on what you make it out of…
| Qty | Name | Comment |
|---|---|---|
| 41 | Wall screws |
You will need at least 41 more screws. That counts 3 per linear rail.
For a wood or plastic build using inserts this can easily be M3x10mm screws. Other options are #4 or equivalent screws suitable for your material. For an extrusion build these will be M3x8mm screws.
You will alaso need hardware to build your box out of your chosen material. Extrusion based builds will need a lot of inserts and screws. Figure at least 41 plus 4-5 per corner joint, plus corner pieces of whatever style you prefer.
Tool mount
You will also need whatever hardware is specified for your tool/extruder you choose.
CAD
The Fusion360 CAD files can be found here, at this link. Please consider these files under this license for now Creative Commons License. This work is licensed under a Creative Commons Attribution-ShareAlike 4.0 International License. For now.
I learned Fusion360 for this project so you can have the actual CAD to edit. Please be nice, I know I made a lot of mistakes early on but it does work. As I progress and edit files I am fixing any early mistakes I made.
Notes for making adjustments…and working through any subsequent CAD errors. - How to resize X axis … - How to resize Y axis … - How to resize Z axis …
Extruder Options
This can really print fast if you use a remote drive or bowden system, but it is plenty robust to handle a direct drive extruder.
The Hemera is a solid option for a direct drive extruder, here is one I desgned and use, along with the CAD files. Hemera Mount on Prusa Printers, Thingiverse- Uses a 5015 fan and the BL Touch.
Initial leveling
Slicer Settings
Want to see how one guy creates something like this?
Ha, it takes a lot of help from my friends! Check out how we all put our heads together in the V1 Forums.
Assembly
Assembly starts on the next page.